Garmin GDL 39 + iPad = Economy Glass Cockpit
 |
| Garmin GDL 39 receiver |
Completed in 1995, our Zenith 601HDS plane, N314LB, has steam gauges plus an outdated GPS unit. The latter equipment drives the 2010 installed Digitrak autopilot.
Recently we added to the cockpit a Garmin GDL 39, which is an ADS-B "In" receiver, and an iPad2, thus getting the capabilities of a glass cockpit.
Cost of the addition was under $1,300 and thus a fraction of the expense associated with standard glass cockpit conversions. The cost figure covers everything: GDL 39; iPad2 with 16GB storage; 12V charger, 3M screen protector, and protective cover for the iPad2; and sales tax. A bargain, really.
Subscription cost for the Garmin Pilot Data, which are required for the operation, is a reasonable $49.99/year. There is no additional charge for weather data.
We do not use optional subscriptions for the Garmin Geo-Ref FliteCharts, cost $49.99/year, or SafeTaxi, cost $29.99/year.
Installation and use of the new equipment forced us onto a steep learning curve.
For a while we thought we were the only ones having difficulties with the installation. But a member of the excellent Garmin Support staff mentioned during one help session that a number of other pilots experienced similar struggles.
That fact motivated us to write this article, in the hope that it will make installation and use easier for other pilot newcomers to the ADS-B system, the GDL 39 receiver, and the iPad.
The System
The "In" part of the ADS-B system sends data via satellites and ground stations to the GDL 39 receiver. We ignore here the ADS-B "Out" part, which concerns data sent by airplanes to the ADS-B system. By 2020, every plane must have "Out" capability.
The GDL 39 receiver processes the data sent by ADS-B, combines them with GPS information, and forwards everything via Bluetooth to the iPad.
In turn, the iPad combines the GDL 39 information with data of its Garmin Pilot data base to offer the pilot a wealth of information, including:
- scalable aviation maps showing the plane’s position, the planned route, TFRs, radar weather, advisories such as AIRMETS and SIGMETs, and PIREPs;
- advisories about nearby traffic, including altitude, speed, and whether ascending or descending;
- airport information including data of the AOPA directory, NOTAMS, ASOS/AWOS weather reports, status as VFR, MVFR, IFR, or LIFR, and even fuel prices.
For complete details, see the Garmin Pilot Manual.
With WiFi connection on the ground, the iPad provides information for flight planning including maps with weather radar. It also supports filing of flight plans.
At the same time, the iPad looks for updates of the Garmin Pilot data base, the Garmin Pilot software, and the GDL 39 software. The latter changes are transmitted to the GDL 39 via Bluetooth whenever the two pieces operate together.
Other Useful Equipment
We strongly advise that you have at home a high-speed Internet connection with WiFi, and a capable PC or Mac computer. Without that equipment, certain steps in the installation process can be cumbersome and frustrating.
Installation of GDL 39
The GDL 39 comes with a User’s Guide booklet supplying installation details. A downloadable version is available in larger format.
The GDL 39 can be powered by an optional battery pack, in which case no power supply wiring is needed. We decided against use of the battery pack, since we typically undertake long flights and do not want to worry about the charge status of the battery.
We chose to hard-wire the GDL 39 into the electrical system. It is prudent that the GDL 39 is not connected when the engine is started or stopped. To achieve this, a power supply wire runs from the avionics master switch to a dedicated switch labeled "GDL".
That switch in turn is connected to the red wire of the Bare Wire Power/Data cable P/N 010-11686-40 that Garmin supplies under one of the cable options. The other end of the cable is plugged into the GDL 39.
The Bare Wire Power/Data cable has, besides the red power supply and black ground wires, another five wires which are not needed when an iPad is used and thus should be suitably capped. An in-line 2 Amp fuse protects the red wire connection.
Years ago we learned the hard way that a row of identical switches on the panel, though beautiful to look at, does not promote safety. At that time, use of a wrong switch blew the internal transponder fuse. Since then, we employ different switches depending on the situation.
The GDL switch is a case in point. It is small and different from the adjacent larger AUTO switch for the autopilot.
 | |
| GDL 39 switch |
We surely do not want to turn off the GDL 39 by mistake when we only intend to reset the autopilot.
Location of GDL 39
If the GDL 39 is located so that it has a clear view of the sky, then the internal GPS and ADS-B antennas suffice. The glare shield most likely is such a location. The Garmin User’s Guide recommends against placing the GDL 39 there, arguing that it might get quite hot.
But discussing this issue with Garmin Support personnel, we were told that the equipment is very heat resistant, having been designed for temperatures up to 60 deg C (140 deg F).
We dislike the glare shield position for a different reason: The GDL 39 then disrupts the forward field of view. Instead, we recommend out-of-the-way installation, where the preference is for a spot where the internal antennas still suffice.
We were lucky that this could be done in our Zenith 601HDS. The unit is placed on the fuselage inside the canopy.
 |
| GDL 39 with open canopy . . . |
 |
| . . . and closed canopy |
If no such favorable installation spot exists in the cockpit, we still recommend installation of the GDL 39 in a convenient position away from the glare shield, and use of external GPS and ADS-B antennas.
Here, preference would be for the low-cost cockpit GPS antenna available from Garmin, which due to its tiny size could be installed on the glare shield.
A reasonably inexpensive choice for the ADS-B antenna that is on the Garmin list of recommended antennas, is the Comant Antenna CI 105.
Garmin imposes the requirement that the ADS-B antenna be at least 3.3 feet away from transmitting antennas and at least 6 inches away from any magnetic compass.
For location of the GPS antenna, see suitable instructions, for example Comant’s GPS Antenna Installation Guidelines.
Garmin recommends that the ADS-B antenna be mounted on the bottom of the aircraft for good ADS-B ground station reception.
iPad2
If you are already an iPad owner and user, you can skip this section.
Apple offers the iPad2, iPad3, iPad with retina display and the iPad mini. In our opinion, the mini is too small to be useful. The iPad3 and iPad with retina display have very high resolution that is not needed. Hence, the iPad2 seems to be the best low-cost choice.
iPads come with various storage capacities. Unless it is planned that the iPad stores music or video, the smallest capacity, 16GB, is plenty. Indeed, with everything installed in our 16GB iPad2, there are more than 13 GB of storage left for use.
In our opinion, Apple makes a mistake by supplying the iPad without any instructions. The box with the iPad contains a few tiny pages with print so small that a magnifying glass would be needed for reading.
Hence we recommend that you download and study the iPad2 User Guide before even taking the iPad out of the box.
It may well be that the operating system of a just-purchased iPad is outdated. Our iPad2, directly purchased from Apple, had that problem. It seems a sign that Apple is too successful.
You can try and update the operating system without assistance, before first use of the iPad. This can lead to loads of trouble, as I found out during a 6 hr phone consultation with Apple Support. Here is another way to deal with the problem.
Buy the iPad in an Apple store. When they give you the package, ask, "Is the operating system up to date?" If they say, "Yes," you are in good shape. If "No," ask them to update it.
They may decline, since this takes a significant amount of time. But if they decline, ask, "Could you please tell me how to do it?" How could they possibly decline that request, just having taken about $400 plus sales tax from you?
Then write down carefully what they tell you. The preferred way is via cable and USB port of your PC or Mac at home, instead of via WiFi where the iPad itself acquires the new operating system.
In the same spirit, ask "Do I need to register the iPad?" They will say, "Yes." Then request, "Could you please help me with the registration?" This they will almost surely do, since it does not take a lot of time. Be prepared by having a suitable choice for login name and password.
Protecting the Screen
We highly recommend installation of a screen protector. There are a bewildering number of protector choices available, with user evaluations all over the map. You will read on the Internet that "A is better than B," then "B is better than C," and finally "C is better than A."
The iPad comes with a thin protective plastic cover. If you agree that a screen protector should be installed, do not remove the factory-supplied cover when carrying out the earlier steps of registration and update of operating system.
Glare is a major problem with the iPad. Some screen protectors claim to eliminate glare entirely. But they may severely reduce brightness of the display. Thus, a compromise is in order.
A reasonable solution seems to be the 3M Natural View Screen Protector for iPad2.
It suppresses glare quite well with no noticeable effect on brightness. It also is very tough.
The blog Installation of 3M Natural View Screen Protector for iPad2 describes an installation process that virtually guarantees perfect results on first try.
Protecting the iPad
Let’s face it, things do get bumped around in the cockpit. The iPad will be no exception.
To safeguard the iPad, buy a sturdy yet light-weight cover that encloses the entire iPad, has all openings for the lens, buttons, and charge connection, and that has a lid magnet so closing the cover turns off the iPad. The downside of such a cover is possible overheating of the iPad in the cockpit, particularly when the screen is exposed to sunlight. There are several remedies for that situation.
Charging the iPad
Lore has it that modern batteries shouldn’t be continuously charged while the equipment is used. Thus, it seems prudent that the iPad is not continuously hooked up to external power during flight. This is not really a problem since the iPad can run for 7-10 hours without charge.
Given these facts, we have a dedicated 12V charger on board of the plane. When the iPad gets down to 50% of battery capacity, we charge it.
Make sure that you get a charger that puts out 10W, or 2.1 A. According to a brief test, the 12V charger replenishes 1% of battery capacity in about 3 minutes.
A longer flight reveals that the connecting cable of the charger outputs a signal that intermittently is picked up by the radio and produces annoying noise in the headset. Investigation of that problem and remedy are described in another post.
You are ready for the next step.
Garmin Pilot App
Register the GDL 39 with Garmin. This is easily done via PC or Mac. You need to create a login name and password, supply the serial number, etc. The instructions are in the GDL 39 User’s Guide mentioned earlier. We chose the same login/password combination used for the iPad registration. Keep that information where you can reach it in case problems develop away from home.
The GDL 39 comes with a free 90-day trial subscription to the Garmin Pilot, with all options. You cannot get this by going to the Apple iTunes store. There is a way to obtain the trial subscription without external assistance, but I never could figure it out.
Instead, simply call the Garmin Support line and tell them "I cannot figure out how to get the 90-day trial subscription." These are very patient and very helpful people. They will tell you what to do.
Most likely, they will ask you to hook up the iPad to your PC and Mac with USB cable, supplied with the iPad, and then go to certain websites, etc.
The problem is that there is a login for the Garmin Pilot nested within the Garmin Pilot app. It is different from the login you defined when you registered the GDL 39. We had to choose a new login name, but used the same password as for the registration of the GDL 39 and iPad, again to simplify handling of problems while away from home.
At this point, you have the Garmin Pilot app in your iPad. With WiFi in your house, you can go out and look at various things, such as national radar weather, flight planning, and so on.
On to another hurdle.
Synchronization of GDL 39 and iPad
You need to synchronize the GDL 39 with the iPad. Garmin recommends against doing this when the GDL 39 is installed in the plane. There may be complications that you cannot figure out in the plane.
Instead, do the synchronization at home. For this, you need a DC power supply for the GDL 39, which accepts 10-32 VDC. Note that the on/off switch of the GDL 39 does not control power to the unit. Indeed, when the red wire has power, the unit is on. That’s why the dedicated "GDL" switch described earlier is needed.
Turn on the iPad, then hook up the GDL 39 to the power supply. A green LED light will show that the GDL 39 has power.
Press the on/off button of the GDL 39 for more than 5 seconds. This causes the unit to look via Bluetooth for the iPad. If all goes well, a blue LED light of the GDL 39 turns on, showing that it has recognized the iPad and established the Bluetooth connection.
Trouble is, this may not happen. In that case, try again. When this fails, it’s time to call Garmin Support. They will diagnose the problem and come up with a fix.
In our case, the iPad was running three apps without us even knowing it, and its brain power was not sufficient to handle the additional GDL 39 Bluetooth query at the same time. Turning off these apps led to success.
Once the GDL 39 has recognized the iPad, subsequent use is simple: turn on the iPad, then turn on the GDL 39. The green and blue LED lights then show that the GDL 30 is operating and connected to the iPad.
At this point, you are ready to install the GDL 39 permanently in the plane.
First Flight
Start the engine, turn on the iPad and then the GDL 39. Start the Garmin Pilot app.
Tap the "Settings" icon. On the left hand side, choose the "GDL 39" option. The screen will show that the GDL 39 is connected. Most likely, within a short time it will also show that some traffic data are received. If you are close enough to an ADS-B ground station, it will be shown on the map as a broadcast tower. Indeed, at Aero Country Airport, two broadcast towers are shown, one more than 35 nm away.
 |
| GDL 39 reception on ground |
Press "Home", and tap on the "Map" icon. The lower left hand corner has a charts symbol. That option produces a table where you pick the "VFR Sectional" option. The screen now displays the VFR sectional appropriate for your location. To center the map with respect to your plane, tap the airplane icon in the lower left corner.
Tap once more the charts symbol. Choose the "Radar (FIS-B)" option. If you receive at least one ground station, weather radar is now overlaid on the sectional.
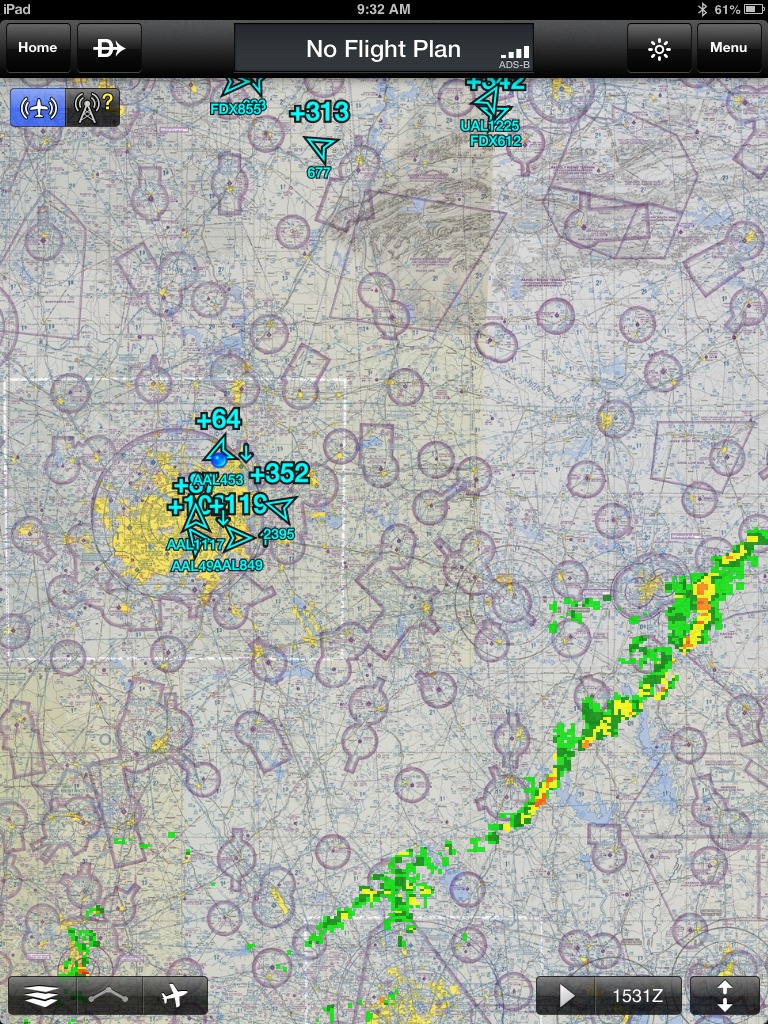 |
| Radar (FIS-B) |
There is much more to explore, of course. While you do that, don’t forget to look out the window. You are flying, after all, and "fly the airplane" is the supreme command.
In fact, its best to do the test flight with a capable copilot. You fly the plane, and he/she tests the equipment.
Two Words of Caution
Until all airplanes have ADS-B "Out" capability, in 2020, the traffic advisory produced by the GDL 39 is not guaranteed to show all airplanes in your vicinity. You must view that advisory as an additional tool to supplement see-and-avoid, and not as a complete display of all nearby traffic.
Radar weather supplied by ADS-B ground stations can be up to 20 minutes old. In rapidly changing weather patterns, do not use that information for operational decisions near thunderstorms and other threatening weather. Instead, use the information for tactical planning.
FAA Advisory Circular 91-78
The Federal Aviation Administration has published Advisory Circular 91-78, which clarifies the requirements that systems like the Garmin GDL 39 plus iPad must satisfy when used for navigation on board of aircraft in lieu of paper reference material. Make sure your installation satisfies those requirements before you use the system that way.
The advisory circular also contains several recommendations. In particular, it suggests that, besides such a system, a secondary or back up source of aeronautical information be available. In the interest of safety, you should definitely have such back up information on board for anything other than a short local flight over familiar territory.
And Now . . .
. . . it’s time to fly and use this wonderful addition to the cockpit. If you want to see how the system has worked for us on a long trip, see the detailed performance evaluation.
Addendum 2017
Garmin stopped updating the Garmin Pilot for the iPad 2 in 2017. In response, we replace it with an iPad Pro 9.7. It has the same screen size as the iPad 2 but weighs less, handles sunshine with less glare, and has better resolution. At the same time, Garmin has improved the Garmin Pilot in many ways. By now, it is a truly great system for navigation and weather analysis.


Comments
Post a Comment